Have you ever experienced difficulty while removing bearings that have become stuck on the mechanical equipment? Pulling the stuck or worn-out bearings out of the machine is tricky. Using methods such as cutting, hammering, or torching is not safe for the machine and can damage the surrounding components. Also, using inappropriate tools can be time-consuming. In such cases, you can use a bearing puller to remove bearings and shaft-mounted components. Bearing pullers make it easier and safer to remove the bearings. Whether you’re a professional or DIY enthusiast, learning about bearing pullers can be valuable for you. Let’s learn about what exactly the bearing puller is, how it works, types, benefits, and ways to maintain it.
What Is A Bearing Puller?
A bearing puller is a special tool for removing the bearings without causing any damage to the machine. Bearings are the vital parts of the machinery that reduce the friction between moving parts of the machine to allow smooth functioning. But, bearings get worn out or stuck over time which makes them difficult to remove. Removing them with improper tools damages the machinery and can cost you a lot. In such cases, bearing pullers come in handy. It provides control over the bearing and pulls it off easily without damaging the machine. Apart from bearings, you can also remove pulleys, gears, and other components of the shaft using bearing pullers.
How Do Bearing Pullers Work?
Bearing pullers work by gripping the component with its jaw and applying controlled force to pull it off the shaft. The bearing pullers have a combination of jaws and hooks and a central spindle. Jaws are attached to the bearing and force is applied using a central spindle to pull out the bearing. Here is the process of using a bearing puller-
- First, select the right bearing puller that is suitable for the bearing type and size that you want to pull out.
- Position the hooks or jaws around the bearing. Grip the bearing using jaws from the outer race of the bearing for external pull, whereas position the hooks inside the inner race for the internal pull.
- After securely placing the jaws, turn the spindle to slowly apply force and pull the bearing out from the shaft. As the puller is tightened, the bearing is smoothly removed without any damage to other components.
Using a bearing not only minimizes the effort but also removes the bearing cleanly and safely.
Common Applications Of Bearing Pullers
Bearing pullers are a versatile tool that has applications from workshops to industries. Some of the most common applications of bearing pullers include-
- Bearing pullers have applications in the automotive industry to remove wheel bearings, alternators, gear bearings, and pulleys. It is a must-have automotive and garage tool. They allow mechanics to disassemble and repair components without damaging the surrounding components.
- They also have applications in home maintenance and DIY projects. One can use them while working on the maintenance of home appliances like dryers, washing machines, and other mechanical systems.
- Professionals of heavy machinery and industries use them for maintenance and repair tasks. It is an efficient tool for removing bearings in conveyor belts, pumps, and large motors where it is difficult to remove bearings without the right tool.
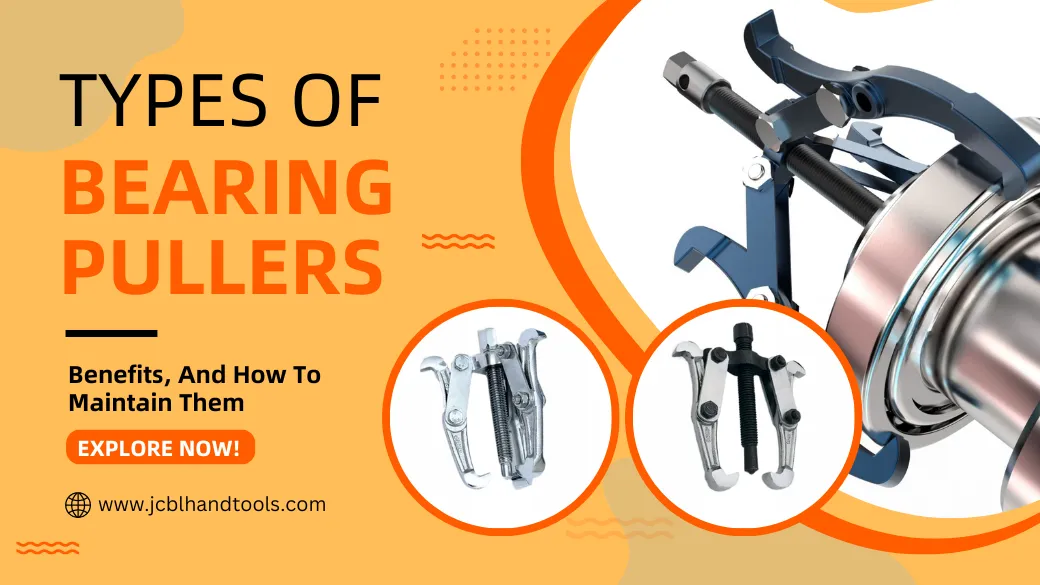
Types Of Bearing Pullers
The bearing pullers come in different sizes and designs based on their area of use and the size of the bearings. Here are a few common types of bearing pullers–
Two-jaw bearing pullers
The two-jaw bearing puller has two jaws that one can use for inside, as well as outside pulls. Such types of bearing pullers are suitable for mechanical and automotive applications. also, these are suitable for small and medium-sized bearings. Although they offer simplicity and ease of use, they do not offer as much stability as others.
Three-jaw bearing pullers
Three jaw-bearing pullers have three jaws, thus offering more stability than two jaw-bearing pullers. Its jaws allow it to evenly distribute the pulling force making it suitable for removing larger bearings or applications that need more grip. Useful for applications where even distribution force is necessary to prevent damage to the bearing or its surrounding components.
Blind bearing pullers
Blind bearing pullers can remove the bearings that are recessed in the machine. They are capable of removing the bearings from holes without the rear access. The pulling arm of blind bearing pullers can slide to the center of the bearing and expand behind it to retract to grip the bearing. Such types of bearing pullers are used in rotating equipment and sealed. One can use them to remove rotating equipment of car gearboxes and wheel bearings.
Hydraulic bearing pullers
The hydraulic bearing pullers use hydraulic power for the removal of bearings from the shaft. Due to their ability to remove large or seized bearings, they have applications in heavy-duty applications. Further, it reduces manual effort and allows one to remove bearings in industrial or automotive settings where there is a need for high force.
Internal vs external bearing pullers
Both are common types of bearing pullers. An internal bearing puller is also called a blind bearing puller. It is used when the bearing is only accessible from the inner diameter. On the other hand, an external bearing puller removes the bearing when it is mounted on the shaft and can be accessed from the outside.
“The selection of a bearing puller depends on the size and accessibility of the bearing that needs to be removed.”
Benefits Of Bearing Puller
Using bearing pullers instead of traditional methods offers numerous benefits. Here are few of the benefits of bearing pullers-
- Allows the bearings to be removed safely without causing any damage to the surrounding components.
- Helps in quick and precise extraction while reducing downtime.
- As they come in different sizes and designs, they are suitable for a variety of applications.
- Can be used in adverse conditions due to their durability.
- Saves the cost of repairs and replacement by preventing the risk of damage to the machine components.
Tips To Maintain And Store Bearing Pullers
To leverage the benefits of tools for a lifetime, they need proper maintenance. Here are a few tips to maintain and store bearing pullers so that they can last a lifetime-
- Properly clean the bearings after every use to remove dirt and debris to prevent rusting and corrosion.
- Regularly inspecting the tool to find out signs of wear and tear or damage is crucial to ensure safe operation.
- Just like other tools, lubricating the bearing pullers is important to ensure that the tool functions without friction.
- Storing the bearing pullers in a dry place is crucial to protect it from moisture that can cause rust and corrosion.
Conclusion
In conclusion, bearing pullers might seem like a simple tool but their role in mechanical, automotive, and other industrial applications is undeniable. They are helpful in home repairs and maintenance to heavy machinery maintenance in automotive for safe and quick removal of the bearings. Selecting the right type of bearing puller for your needs is important to complete the job efficiently. Also, maintaining and storing them properly will ensure the longevity of your tool.
Are you looking for premium quality bearing pullers? Don’t worry! At JCBL Hand Tools, we manufacture and supply high-quality bearing pullers and other hand tools to your needs. Our products meet international quality standards for customer satisfaction. Visit us to check our products.
FAQ’s
Can I use bearing pullers on other machine parts?
Yes, you can use bearing pullers to remove other machine parts such as gears, pulleys, and other components. But its use depends on the application and feasibility of the machine part.
How do I know which size puller to choose?
While selecting the bearing puller, you should consider the size of the bearing. The size of the puller should match the diameter of the bearing and the space available around the bearing.